Note, for those who prefer a visual answer to this question, Plugable has produced a video that demonstrates how to fix this issue:
For those that prefer a written explanation and solution, please continue reading.
Summary
When a Windows desktop computer is used with a Plugable DisplayLink-based docking station or USB graphics adapter, and no monitor is connected directly to the desktop computer’s built-in video output, Windows may list an extra display in Display Settings even though no monitor is physically connected to that output. Plugable refers to this as a phantom display.
If Windows sets the phantom display as the main display, desktop icons, application windows, or the Windows sign-in screen may appear to be missing because Windows is placing them on a display that is not actually present.
This can usually be resolved by moving the Windows Display Settings window onto a visible monitor, setting one of the Plugable-connected displays as the main display, and setting the phantom display to Disconnect this display.
Applicable To
- Plugable DisplayLink-based USB docking stations
- Plugable DisplayLink-based USB graphics adapters
- Windows desktop computers
- Setups where the only connected monitors are attached through the Plugable DisplayLink device
- Setups where desktop icons, application windows, or the Windows sign-in screen appear missing, off-screen, or on the wrong display
Answer
This behavior is usually caused by a phantom display being configured as the Windows main display.
In Windows Display Settings, each detected display appears as a numbered box. In this scenario, one numbered display may represent a video output on the desktop computer’s built-in graphics adapter even though no monitor is actually connected to that output. If Windows treats that non-visible display as the main display, Windows may place desktop icons, the sign-in screen, and new application windows there.
To resolve the issue:
- Bring the Windows Display Settings window onto a visible monitor.
- Use Identify to determine which display number does not appear on any physical monitor.
- Select a real display connected through the Plugable DisplayLink device and enable Make this my main display.
- Select the phantom display and change it to Disconnect this display.
Why This Happens
DisplayLink-based docking stations and USB graphics adapters transmit display data over a USB data connection. This is different from connecting a monitor directly to the computer’s built-in HDMI, DisplayPort, DVI, or VGA output.
Because the monitors connected through DisplayLink are not connected directly to the desktop computer’s built-in graphics output, some Windows desktop systems may still show an additional display associated with the system’s native graphics hardware. This display may remain listed even though no physical monitor is connected to it.
If Windows makes this phantom display the main display, desktop icons and application windows can become difficult to find because they are being opened on a display that is not visible.
Before You Begin
The steps below are written for Windows 11 and assume the following example setup:
- The desktop computer is already running Windows.
- No monitors are connected directly to the video outputs built in to the desktop computer.
- A Plugable DisplayLink-based docking station or USB graphics adapter is connected to the computer.
- Two external displays are connected to the Plugable DisplayLink device.
- At least one Plugable-connected display is visible enough to use the Windows taskbar, mouse, and keyboard.
The same general process applies if your display numbers or number of connected displays are different from the example shown below.
Optional Video Reference
Before starting, you may want to review Plugable’s short video on using Windows keyboard shortcuts to move application windows between displays. This is useful if the Display Settings window opens on the phantom display and is not visible.
How to move application windows using keyboard shortcuts in Windows
How To Fix the Phantom Display in Windows
1) Right-click on an empty area of the Windows desktop on one of the visible displays connected to the Plugable DisplayLink device.
2) Select Display settings.
In many cases, the Display Settings window will open on the phantom display and will not be visible. However, you may see the Display Settings icon on the Windows taskbar.
3) Select the Display Settings icon on the Windows taskbar to make sure the Display Settings window is active.
4) Press Windows key + Shift + Right Arrow to move the active window to another display.
If the Display Settings window does not appear, press the shortcut again. You can also try Windows key + Shift + Left Arrow. Repeat until the Display Settings window appears on a visible display.
5) At the top of Display Settings, look for the numbered display boxes. Select Identify.
Windows will briefly show a number on each physical display. Make a note of the display number that does not appear on any physical monitor. That number represents the phantom display.
For example, if Windows shows display numbers 1, 2, and 3, but only numbers 2 and 3 appear on your real monitors, display 1 is the phantom display.
6) Select one of the real displays connected through the Plugable DisplayLink device. In this example, display 2 is selected.
7) Under Multiple displays, place a check mark next to Make this my main display.
This sets the selected real display as the Windows main display. The Windows sign-in screen, desktop icons, and newly opened application windows should now appear on that display.
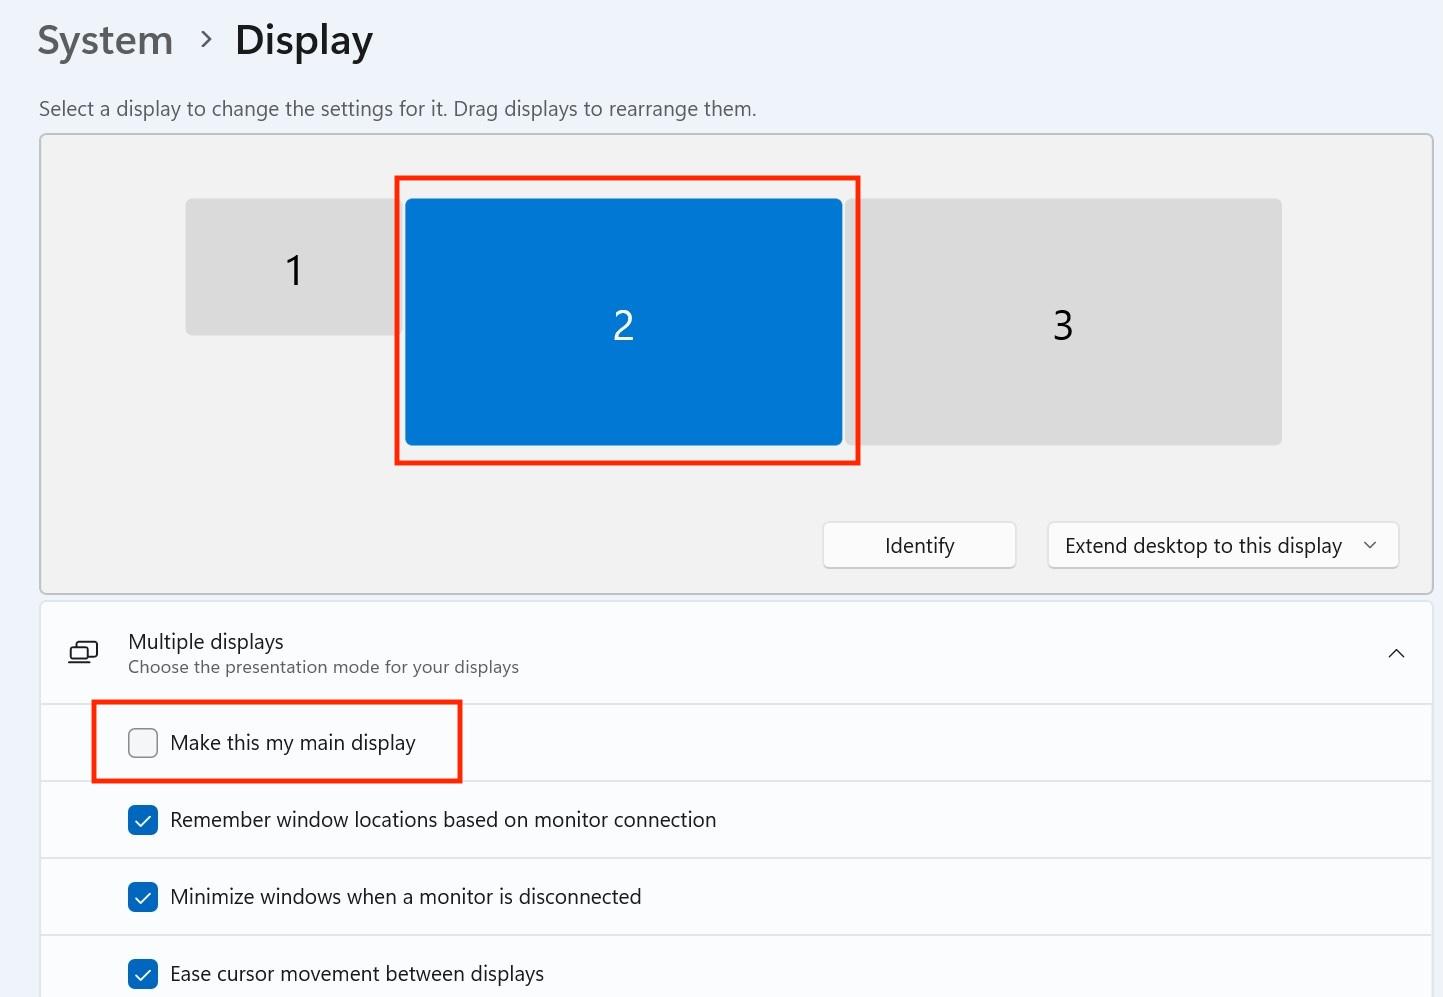
8) Next, select the numbered display box for the phantom display. In this example, display 1 is the phantom display.
9) Under Multiple displays, open the display mode drop-down menu and select Disconnect this display.
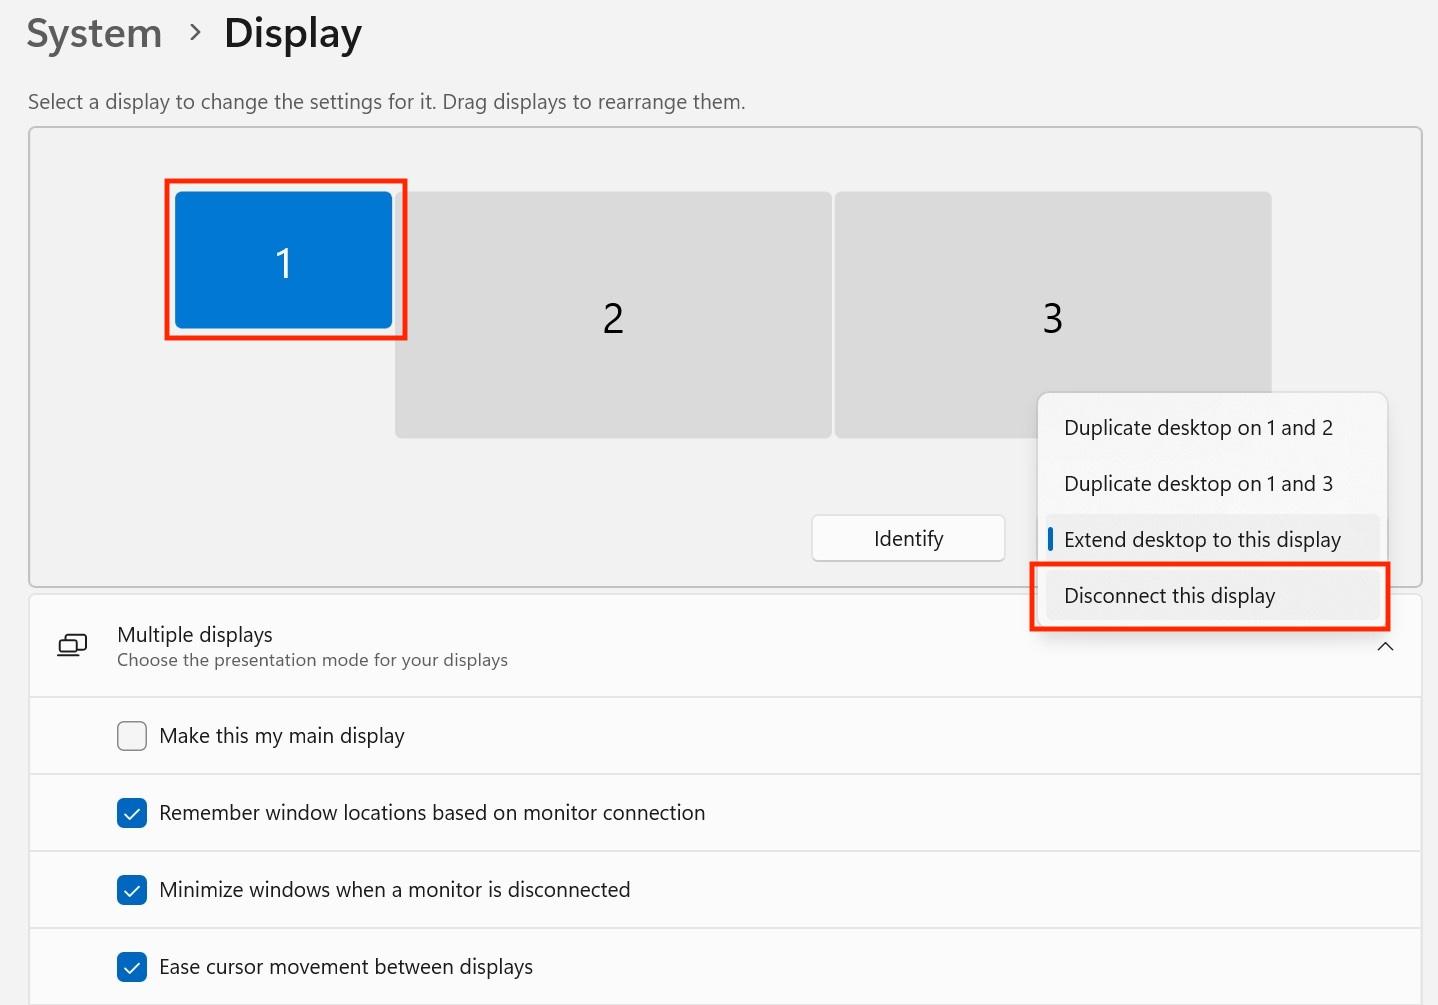
After this change, the phantom display will be disabled. One of the real displays connected to the Plugable DisplayLink device should now be configured as the main display, and desktop icons and application windows should appear on the visible displays.
Important Notes
- Even after the phantom display is disconnected, its display number may still appear in Windows Display Settings. This is expected. The disconnected display may appear smaller than the active displays.
- Windows does not provide a way to completely hide the disconnected display from the Display Settings page.
- Do not disconnect a display number if that number appears on a real physical monitor that you want to use.
- When possible, Plugable recommends connecting at least one monitor directly to a desktop computer’s native graphics output, such as HDMI, DisplayPort, DVI, or VGA, and using DisplayLink-connected displays as additional monitors.
- If none of the displays connected to the Plugable DisplayLink device are working, or if the Plugable device is not detected at all, follow Plugable’s DisplayLink driver clean installation process instead: My DisplayLink-based USB Docking Station or USB Video Adapter Is Not Working As Expected with a Windows computer.
Troubleshooting
Display Settings does not appear on a visible monitor
Select the Display Settings icon in the Windows taskbar, then press Windows key + Shift + Right Arrow or Windows key + Shift + Left Arrow. Repeat the shortcut until the Display Settings window appears on one of the visible displays.
I cannot tell which display is the phantom display
Use the Identify button in Windows Display Settings. The display number that does not appear on any physical monitor is the phantom display. If every display number appears on a real monitor, do not disconnect any of them.
The display changes do not save
When Windows asks you to confirm the display change, make sure to keep or confirm the new setting before the timer expires. If the setting does not save, restart the computer and repeat the steps.
Displays are still not working correctly after disconnecting the phantom display
Try the following:
- Restart the computer.
- Disconnect and reconnect the Plugable DisplayLink device.
- If possible, connect one monitor directly to the desktop computer’s native graphics output and confirm that Windows is using that display as the main display.
- Perform a clean installation of the DisplayLink driver using Plugable’s DisplayLink troubleshooting guide.
- If the issue continues, collect logs with Plugable’s PlugDebug diagnostic utility and contact Plugable Support.
Need Assistance?
If the issue continues after following the steps above, contact Plugable Support at support@plugable.com. Please include the Plugable product model, your Windows version, the desktop computer make and model, the number of connected displays, how each display is connected, and whether any monitor is connected directly to the desktop computer’s built-in video output.
For the fastest assistance, please also include the output from Plugable’s PlugDebug diagnostic utility: PlugDebug.