前提条件
この記事は下記のシステム構成についての情報です。
- オペレーティングシステム: Windows 10 および Windows 11
- 製品: DisplayLink チップセットを搭載した、Plugable 社製ドッキングステーションおよびグラフィック変換アダプター
この作業は、Windows 画提供するコマンドプロンプト(または Windows ターミナル)を使用します。結果としていくつかの Windows 規定値の設定や動作を変更することになるため、Windows OS に精通したユーザーが実行することを想定しています。この作業を行う前にシステムのバックアップを取得し、問題が生じたときには前の環境に戻せるようにしておいてください。
電源プランとは?
Windows 10 以降のシステムでは、スリープモードになるまでの時間やノート PC の蓋を閉じて使用するときの動作、USB 機器による電源供給や通信方法などの設定値を「電源プラン」と呼ばれる構成値を利用して保存および管理しています。
DisplayLink 機器と電源プラン最適化の必要性
Windows の既定値では、「バランス」モードが使用されており、バランスモードに設定された様々な構成値はユーザーが変更可能です。この OS 提供の「バランス電源モード」の値を使用しているシステムでは、USB ドッキングステーションなどの外部 USB 接続機器が正しく機能しないことがあると報告されています。あるいは、Windows のアップデートや何らかのソフトウェアの導入により、この値がリセットや変更される場合もあります。
Plugable 社製の DisplayLink 機器を使用している構成で問題が生じた場合には、電源プランを最適化すると解決できることがあります。
概要
電源プランの仕組みでは、ユーザーがカスタマイズして保存した設定構成ファイルを使用することが可能です。Windows の既定値である「バランスモード」をまず複製してからそれを好みの値に変更し、別の名前で保存してカスタム設定として使用することをお勧めします。
このようにすれば元の「バランスモード」を既定値のままにしておき、必要な場合にはバックアップとして使用できます。
新しい電源モードの作成手順
Windows は電源モードを作成するための GUI 画面を用意していますが、これが正しく機能しない場合があります。Windows システムに慣れているパワーユーザーであれば、GUI ではなくコマンドプロンプトから作成することも可能です。下記の手順に従ってください。
- GUI またはコマンドプロンプトを使用して既定の電源プランを複製し、複製した方の電源プランをアクティブとして設定する(これにより、オリジナルの電源プランをバックアップとして保護する)
- 複製した電源プラン(アクティブな電源プラン)をカスタマイズする
1.電源プランを複製する(A または B を実行)
注:コントロールパネル(GUI)から電源プランを複製しようとしても、システムによってはうまくいかないことがあると報告されています。そのような場合は Windows のコマンドプロンプト(Windows ターミナル)から作成してください。
A. Windows コントロールパネル(GUI)から電源プランを複製する
- Windows ボタンを押し、検索フィールドに「powercfg.cpl」と入力します。これによりコントロールパネル内の「電源オプション」ページが開きます。
- 左側のリストから「電源プランの作成(Create a power plan)」をクリックします。
- 「電源プランの作成」パネルで、「既存のプランで開始し、そのプランに名前を付けます」の下が「バランス」であることを確認してください。
- 「プラン名」の中に、使用目的がわかりやすい電源プラン名を入力してください。たとえば「DisplayLink 用」などです。
- 「次へ」ボタンを押します。
- 「プラン設定の変更」画面が表示されますが、ここでは何も変更せずに「作成」ボタンを押して「電源プランの選択またはカスタマイズ」画面にもどります。
- 作成したプラン名の横にあるチェックボックスをチェックし、選択します。
- 作成された新しいカスタマイズ用電源プランがリストされ、選択されていることを確認してこのページを閉じます。
B. コマンドプロンプトから電源プランを複製する
- Windows コマンドプロンプト(cmd.exe)または、Windows ターミナルを開きます。(Windows キーを押し、cmd.exe を入力するか、スタートボタンを右クリックして「Windows ターミナル」を選択します)
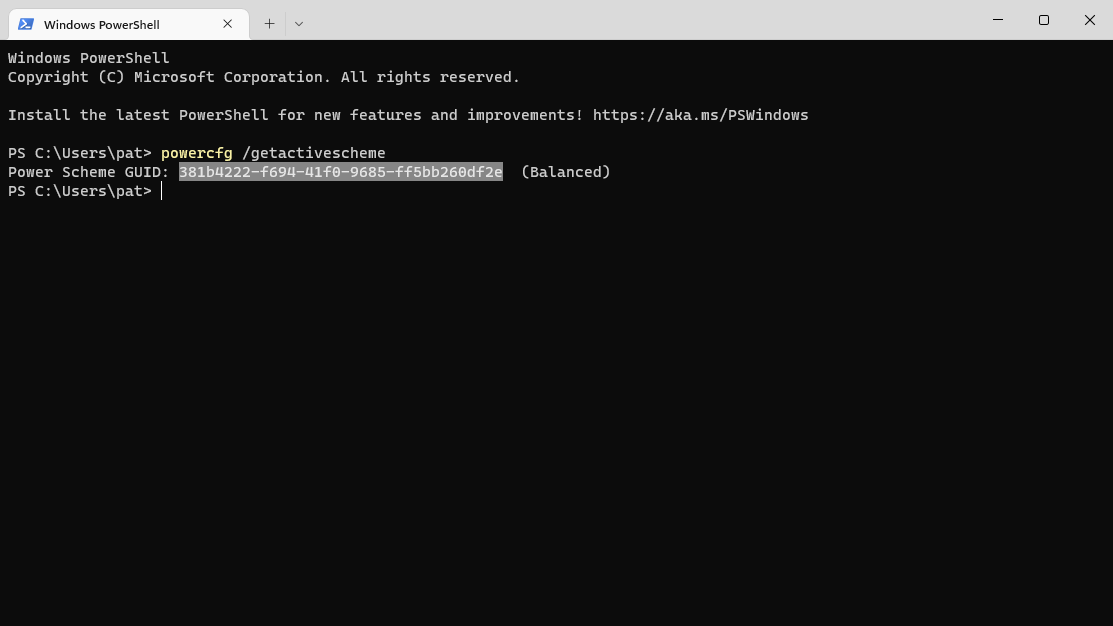
- 現在使用されている(アクティブ状態の)電源プラン情報を入手するために、「
powercfg /GetActiveScheme」と入力し、エンターキーを押します。 - 表示された「電源設定の GUID(Power Scheme GUID)」の値をコピーします。下記の例では、「3814b4222-f694-41f0-9685-ff5bb260df2e」という値です。このとき、コピー元の電源プラン名がそのあとの()内に表示されていますので、これが「バランス」であることを確認してください。
-
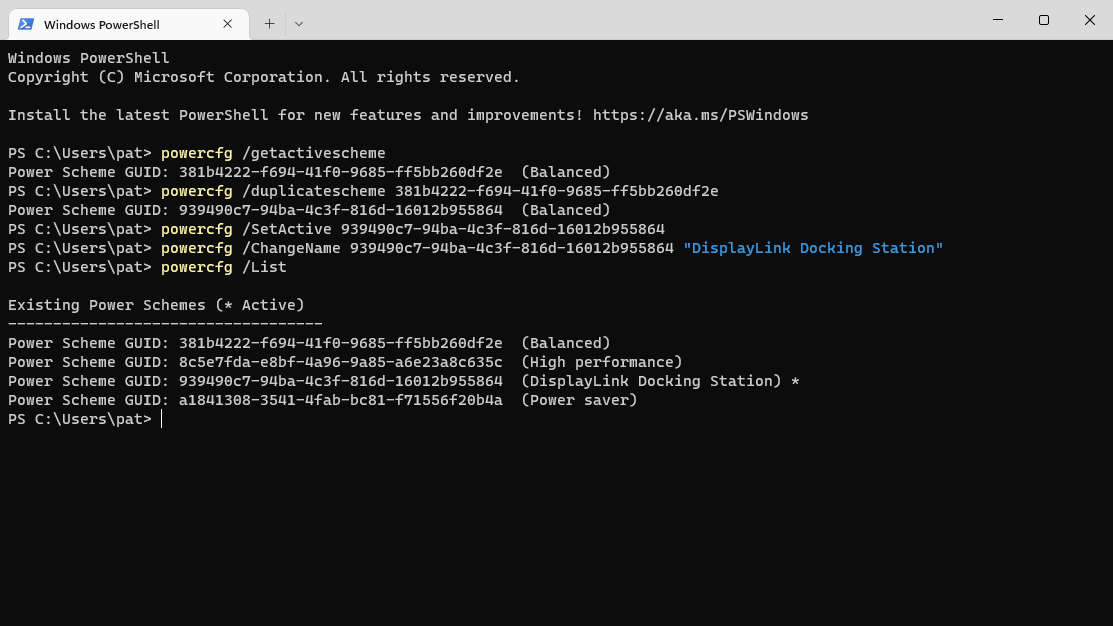
指定した GUID の電源プランを複製します。「
powercfg /DuplicateScheme」と入力し、後にスペースがある状態でコピーした GUID 値をペーストしてエンターキーを押します。 - 電源プランが複製され、上記の 3 番と同じ形式で新しい GUID が表示されます。この GUID を再度コピーしてください。
- 複製した電源プランの名前を変更します。「
powercfg /ChangeName」と入力し、後にスペースがある状態で新しい GUID をペーストします。その後にさらにスペースを入力してから、新しい電源プランの名前を入力してエンターキーを押します。例えば「DisplayLink 用」などです。 - 複製した新しい名前の電源プランをアクティブなものとして設定します。「
powercfg /SetActive」と入力し、後にスペースがある状態で複製した GUID 値をペーストしてエンターキーを押します。 - 最後に、意図通りに電源プランを複製しアクティブに設定できたかを確認します。「
powercfg /List」と入力しエンターキーを押します。「既存の電源設定」リストが表示され、「電源設定の GUID」がリストされます。このうちアクティブなものには(*)マークがついています。
2.電源プランをカスタマイズする
DisplayLink 機器に最適化された電源プランを構成するために、電源プラン内の下記2つの設定をカスタマイズする必要があります。
- 「コンピュータが電源に接続しているとき、一部の USB 機器をサスペンドする(USB Selective Suspend)」設定をオフにする
- 「コンピュータが電源に接続しているとき、PCIe リンク状態電源管理機能(PCIe Link State Power Management)」設定をオフにする
しかし、Windows が提供する GUI(電源プランのカスタマイズ画面)ではいくつかのオプションが隠されており、上記を変更することができません。設定値変更はコマンドプロンプトまたは Windows ターミナルから下記を実施する必要があります。
2-1.「USB Selective Suspend」設定をオフにする
- Windows コマンドプロンプト(cmd.exe)または、Windows ターミナルを開きます。
- 現在使用されている(アクティブ状態の)電源プラン情報を入手するために、「
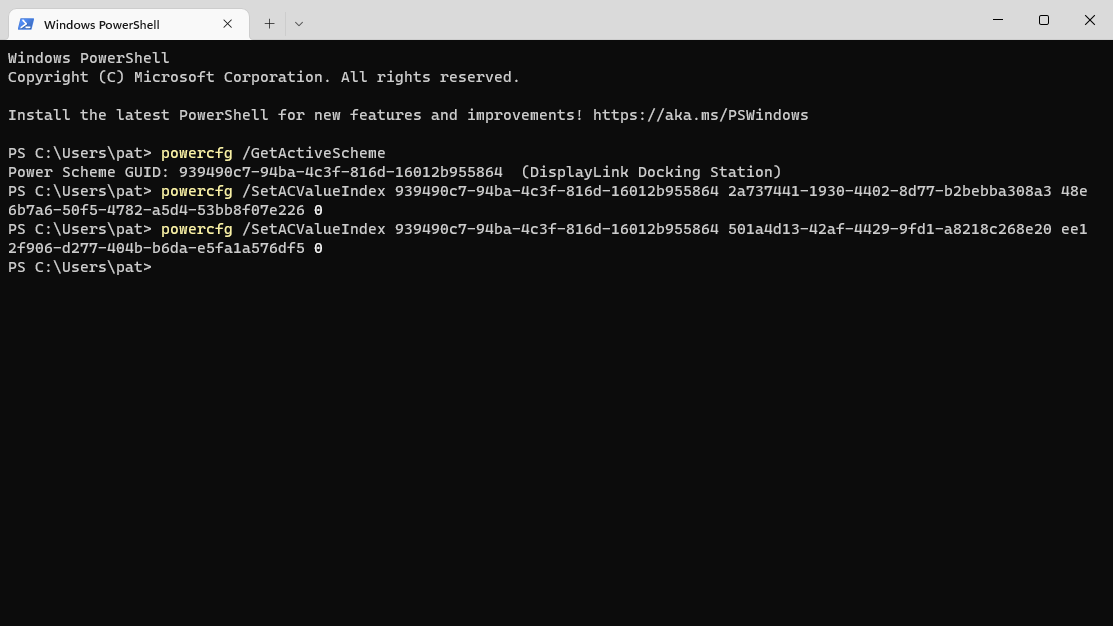
powercfg /GetActiveScheme」と入力し、エンターキーを押します。このとき、表示された行の()内に、構成変更したい新しい電源プラン名が表示されていることを確認してください。 - 表示された「電源設定の GUID(Power Scheme GUID)」の値をコピーします。
- 電源プランの設定を変更します。「
powercfg /SetACValueIndex」の後に GUID 値をペーストし、「2a737441-1930-4402-8d77-b2bebba308a3 48e6b7a6-50f5-4782-a5d4-53bb8f07e226 0」を入力します。その後エンターキーを押して実行してください。 - 続けて、次の設定値の変更をします。
2ー2.「PCIe Link State Power Management」設定をオフにする
- 同じコマンドプロンプトの中から「
powercfg /SetACValueIndex」の後に GUID 値をペーストし、「501a4d13-42af-4429-9fd1-a8218c268e20 ee12f906-d277-404b-b6da-e5fa1a576df5 0」を入力します。その後エンターキーを押して実行してください。 - 上記が完了すると、ターミナル内は下記のような表示になります。
- ターミナルを閉じます。この変更は通常の場合すぐに適用されますが、念のために一度システムをリスタートすることを強くお勧めします。


